Volley之四个队列的配合使用
概述
在Volley中,存在这四个重要的队列,这次想单独来分析一下这四个队列的配合使用。
先看看源码中的四个队列,这四个队列在RequestQueue中:
12345678910111213141516171819202122232425262728/*** Staging area for requests that already have a duplicate request in flight.** <ul>* <li>containsKey(cacheKey) indicates that there is a request in flight for the given cache* key.</li>* <li>get(cacheKey) returns waiting requests for the given cache key. The in flight request* is <em>not</em> contained in that list. Is null if no requests are staged.</li>* </ul>*/private final Map<String, Queue<Request>> mWaitingRequests =new HashMap<String, Queue<Request>>();/*** The set of all requests currently being processed by this RequestQueue. A Request* will be in this set if it is waiting in any queue or currently being processed by* any dispatcher.*/private final Set<Request> mCurrentRequests = new HashSet<Request>();/** The cache triage queue. */private final PriorityBlockingQueue<Request> mCacheQueue =new PriorityBlockingQueue<Request>();/** The queue of requests that are actually going out to the network. */private final PriorityBlockingQueue<Request> mNetworkQueue =new PriorityBlockingQueue<Request>();上面的四个队列中,有两个队列的类型是一样的,都是无界阻塞队列,而剩下的一个是HashSet队列,另一个则是Hashmap。
- Set集合最大的一个特点就是集合中的元素是不能重复的,如果向其中添加重复的元素的话,就出现返回false来表示添加失败。
在分析队列之前,我们先来看看start方法中:
1234567891011121314public void start() {stop(); // Make sure any currently running dispatchers are stopped.// Create the cache dispatcher and start it.mCacheDispatcher = new CacheDispatcher(mCacheQueue, mNetworkQueue, mCache, mDelivery);mCacheDispatcher.start();// Create network dispatchers (and corresponding threads) up to the pool size.for (int i = 0; i < mDispatchers.length; i++) {NetworkDispatcher networkDispatcher = new NetworkDispatcher(mNetworkQueue, mNetwork,mCache, mDelivery);mDispatchers[i] = networkDispatcher;networkDispatcher.start();}}在实例化缓存线程和网络线程的时候将对应的队列都传入构造方法中,也就是缓存线程和网路线程中的对应的队列都是引用指向该类中实例化的队列,这样在向队列添加元素的时候,对应的线程就能处理,换句话说,所有添加队列元素的操作都在该类中的一个add方法中。那么,接下来自然要看看add方法:
123456789101112131415161718192021222324252627282930313233343536373839404142434445/*** Adds a Request to the dispatch queue.* @param request The request to service* @return The passed-in request*/public Request add(Request request) {// Tag the request as belonging to this queue and add it to the set of current requests.request.setRequestQueue(this);synchronized (mCurrentRequests) {mCurrentRequests.add(request);}// Process requests in the order they are added.request.setSequence(getSequenceNumber());request.addMarker("add-to-queue");// If the request is uncacheable, skip the cache queue and go straight to the network.if (!request.shouldCache()) {mNetworkQueue.add(request);return request;}// Insert request into stage if there's already a request with the same cache key in flight.synchronized (mWaitingRequests) {String cacheKey = request.getCacheKey();if (mWaitingRequests.containsKey(cacheKey)) {// There is already a request in flight. Queue up.Queue<Request> stagedRequests = mWaitingRequests.get(cacheKey);if (stagedRequests == null) {stagedRequests = new LinkedList<Request>();}stagedRequests.add(request);mWaitingRequests.put(cacheKey, stagedRequests);if (VolleyLog.DEBUG) {VolleyLog.v("Request for cacheKey=%s is in flight, putting on hold.", cacheKey);}} else {// Insert 'null' queue for this cacheKey, indicating there is now a request in// flight.mWaitingRequests.put(cacheKey, null);mCacheQueue.add(request);}return request;}}一开始就向mCurrentRequest中添加请求,由于set集合的特点,添加相同的元素是不能成功添加的,所以该队列的作用是记录所有不同的网络请求。
- 接下来的逻辑是这样的:先判断mWaitingRequests中是不是存在该请求的key值,不存在的话在mWaitingRequests中添加key-value:cacheKey-null,这样的操纵是为了下一次有相同的请求添加进来的情况作准备,如果下次有相同的请求添加进来,mWaitingRequests中已经有了该关键子,所以会进入if语句中,在if中,主要的操作就是将该相同的请求放进一个Queue中,该Queue对应一个key值,放进mWaitingRequest中,
- 现在我们来梳理一下这个方法:总的来说mWaitingRequest中存放的是相同的请求的队列,而mCurrentRequest则是存放所有的不同的请求的队列。
我们在add方法中看到,添加进来的请求会有两个去向(假设该请求是第一次发送,也就是说缓存队列中没有该请求),一是被放进网络队列,二是被添加进缓存队列,这样的话,我们先来看看网络线程中的操作:
12345678910111213141516171819202122232425262728293031323334353637383940414243444546474849505152535455565758596061626364public void run() {Process.setThreadPriority(Process.THREAD_PRIORITY_BACKGROUND);Request request;while (true) {try {// Take a request from the queue.request = mQueue.take();} catch (InterruptedException e) {// We may have been interrupted because it was time to quit.if (mQuit) {return;}continue;}try {request.addMarker("network-queue-take");// If the request was cancelled already, do not perform the// network request.if (request.isCanceled()) {request.finish("network-discard-cancelled");continue;}// Tag the request (if API >= 14)if (Build.VERSION.SDK_INT >= Build.VERSION_CODES.ICE_CREAM_SANDWICH) {TrafficStats.setThreadStatsTag(request.getTrafficStatsTag());}// Perform the network request.NetworkResponse networkResponse = mNetwork.performRequest(request);request.addMarker("network-http-complete");// If the server returned 304 AND we delivered a response already,// we're done -- don't deliver a second identical response.if (networkResponse.notModified && request.hasHadResponseDelivered()) {request.finish("not-modified");continue;}// Parse the response here on the worker thread.Response<?> response = request.parseNetworkResponse(networkResponse);request.addMarker("network-parse-complete");// Write to cache if applicable.// TODO: Only update cache metadata instead of entire record for 304s.if (request.shouldCache() && response.cacheEntry != null) {mCache.put(request.getCacheKey(), response.cacheEntry);request.addMarker("network-cache-written");}// Post the response back.request.markDelivered();mDelivery.postResponse(request, response);} catch (VolleyError volleyError) {parseAndDeliverNetworkError(request, volleyError);} catch (Exception e) {VolleyLog.e(e, "Unhandled exception %s", e.toString());mDelivery.postError(request, new VolleyError(e));}}}在while循环中,从网络队列拿出了一条请求,也就是我们之前放的(当网络队列为空时,该线程会出现阻塞情况),接着就是网络访问,我们这里先不讨论网路访问的细节,我们来看看请求完得到Response对象后的操作:
1mDelivery.postResponse(request, response);这句话的意思就是把得到的请求通过Delivery post出去,这时候我们就得来看看该类的具体实现类中的方法了的run方法:
1234567891011121314// Deliver a normal response or error, depending.if (mResponse.isSuccess()) {mRequest.deliverResponse(mResponse.result);} else {mRequest.deliverError(mResponse.error);}// If this is an intermediate response, add a marker, otherwise we're done// and the request can be finished.if (mResponse.intermediate) {mRequest.addMarker("intermediate-response");} else {mRequest.finish("done");}如果isSuccess的话,就deliverResponse,该方法是我们具体的请求实现类中重写的方法,也就是我们在客户端的网络请求回掉
接着我们看到还调用了Request的finish,而finish又是调用了Request中的finish,我们来看看:
12345678910111213141516171819202122void finish(Request request) {// Remove from the set of requests currently being processed.synchronized (mCurrentRequests) {mCurrentRequests.remove(request);}if (request.shouldCache()) {synchronized (mWaitingRequests) {String cacheKey = request.getCacheKey();Queue<Request> waitingRequests = mWaitingRequests.remove(cacheKey);if (waitingRequests != null) {if (VolleyLog.DEBUG) {VolleyLog.v("Releasing %d waiting requests for cacheKey=%s.",waitingRequests.size(), cacheKey);}// Process all queued up requests. They won't be considered as in flight, but// that's not a problem as the cache has been primed by 'request'.mCacheQueue.addAll(waitingRequests);}}}}首先在mCurrentRequest中移除已经成功访问的请求
- 接着判断该请求是不是该缓存(默认是缓存的),再移除mWaitingRequests中持有该请求key的相同请求,最后添加进缓存队列
- 我们来小结:在finish方法中主要是在mWaitingQueue中移除成功响应的请求,接着如果mWaitingQueue中有相同的请求的话,就把这相同的请求添加进缓存队列。
最后,我们来分析分析缓存线程:
1234567891011121314151617181920212223242526272829303132333435363738394041424344454647484950515253545556575859606162636465666768697071727374757677787980public void run() {if (DEBUG) VolleyLog.v("start new dispatcher");Process.setThreadPriority(Process.THREAD_PRIORITY_BACKGROUND);// Make a blocking call to initialize the cache.mCache.initialize();while (true) {try {// Get a request from the cache triage queue, blocking until// at least one is available.final Request request = mCacheQueue.take();request.addMarker("cache-queue-take");// If the request has been canceled, don't bother dispatching it.if (request.isCanceled()) {request.finish("cache-discard-canceled");continue;}// Attempt to retrieve this item from cache.Cache.Entry entry = mCache.get(request.getCacheKey());if (entry == null) {request.addMarker("cache-miss");// Cache miss; send off to the network dispatcher.mNetworkQueue.put(request);continue;}// If it is completely expired, just send it to the network.if (entry.isExpired()) {request.addMarker("cache-hit-expired");request.setCacheEntry(entry);mNetworkQueue.put(request);continue;}// We have a cache hit; parse its data for delivery back to the request.request.addMarker("cache-hit");Response<?> response = request.parseNetworkResponse(new NetworkResponse(entry.data, entry.responseHeaders));request.addMarker("cache-hit-parsed");if (!entry.refreshNeeded()) {// Completely unexpired cache hit. Just deliver the response.mDelivery.postResponse(request, response);} else {// Soft-expired cache hit. We can deliver the cached response,// but we need to also send the request to the network for// refreshing.request.addMarker("cache-hit-refresh-needed");request.setCacheEntry(entry);// Mark the response as intermediate.response.intermediate = true;// Post the intermediate response back to the user and have// the delivery then forward the request along to the network.mDelivery.postResponse(request, response, new Runnable() {public void run() {try {mNetworkQueue.put(request);} catch (InterruptedException e) {// Not much we can do about this.}}});}} catch (InterruptedException e) {// We may have been interrupted because it was time to quit.if (mQuit) {return;}continue;}}}第一步的操作跟网络线程中差不多,先从缓存队列中拿出请求,接着判断该缓存请求的结果是不是有被写进缓存和是不是完全过期。如果没有被写进缓存的话,就添加进网络队列(也就是让网路线程处理该请求);如果完全过期的话,也添加进网络队列。
- 接下来判断从缓存中拿出的请求是不是需要更新,需要的话,就post到线程池中,将请求添加网络队列,接下来的处理跟上面分析网络线程一样。
总结
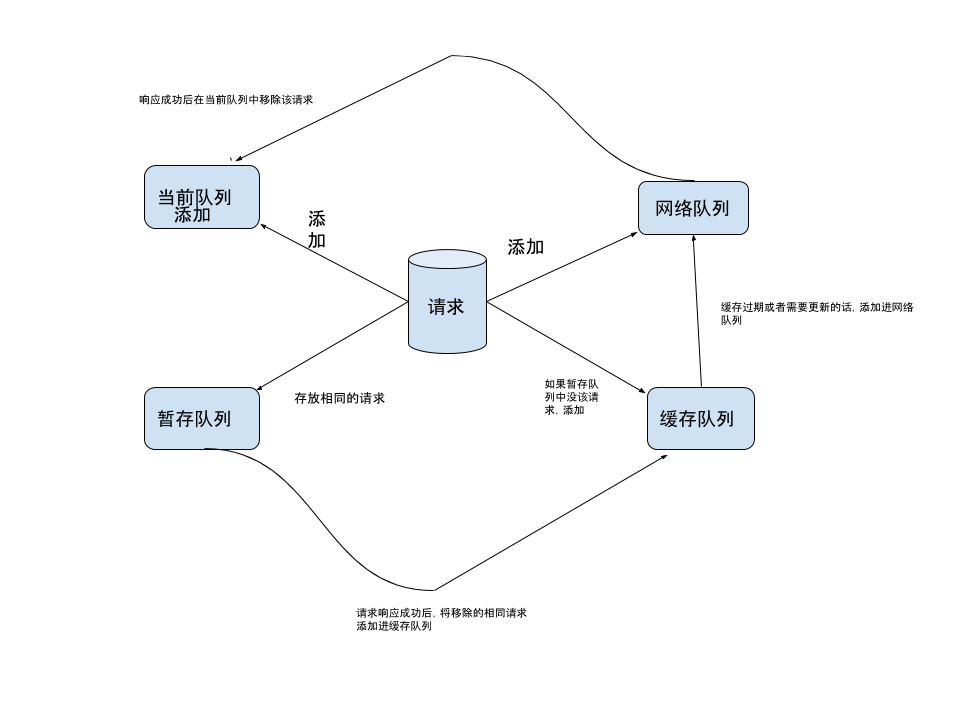
- 从上面的分析,可以看出来,mCurrentRequests中保存的是所有不同的网络请求,该唯一性是有set集合的特点来保证的;mWaitingRequests则是暂存相同的请求,缓存队列和网络队列就不用说都明白了。
- 至于他们之间的配合,看看下面这张图的话,会更清晰: